Thursday, December 29, 2011

Christmas Goodies

Yes Christmas is a time to celebrate the birth of Jesus, but it is also a time of giving.  And although it is better to give than receive, that doesn't make it bad to show off the cool new stuff you were given. I mentioned back in May in my New Tools post that my family supports my hobbies and that is still true.

I got a nice set of router bits, a pipe clamp, and a workhorse.  I also got a new router set that came with a fixed base and a plunge base.  I had been using borrowed routers so this was a nice gift.  I also received a table saw.  The table saw is a portable saw and will be a good starting point for the smaller projects I am wanting to make.

Also the rocking horses were a hit. Here is a picture of my nephew and me with his rocking horse.
And here is a shot of my son on his rocking horse

Thursday, December 22, 2011

Giddy Up

Last week I mentioned that I had bust sanding the rocking horse parts, well I am proud to say that the rocking horses are done. 

Over the weekend I started finishing, the saddle parts all got a coat of stain.  


I was trying to finish the rocking horse using the same technique that I had watched Marc (The Wood Whisperer) use which was to give the sides a coat of shellac before staining the mane. Below are the all the parts that got a spray coat of Clear Zinsser Bulls Eye Shellac. 
 However when I tried to stain the mane area the shellac kept the wood from taking any stain, so I sanded the shellac off the area to be stained. and here it how the mane looked after wards.
 The next day after the stain had time to dry/cure I brushed on 2 coats of shellac.  Shellac dries and can be recoated in around a hour.


 Once everything had a chance to dry it was time assemble the rocking horses.
 I used a plug cutter to plug the screw holes on the sides. The plugs were then trimmed and sanded flush. Then the sanded area was touched up with a light coat of shellac.
 After assembly the rocking horses got 2 more coats of shellac sprayed on.
 I think I am more excited about these presents than any present ever.  One is for my son who is almost 1.5 and the other is for my nephew. I can't wait to see the boy's reaction to them.
Merry Christmas and may God bless you and yours.

Thursday, December 15, 2011

Busy as an Elf

Merry Christmas

I've been a busy elf trying to get the 2 rocking horses done that are supposed to be gifts.  I've been getting a fair amount of shop time in short burst. My typical shop time is 9 pm to 10:30 or so. I've got all the edges on the rocking horses routed, and I just have sand everything one more grit and do a dry assembly before finishing the parts. I have to be done by Christmas Eve.

Tuesday, December 6, 2011

Wednesday, November 23, 2011

Rocking Horse Charity Build Results

The Wood Whisperer posted the official results of 120 rocking horses being built. The total amount raise is still to be determined, but as of right now is at $5,196.  A Gallery has been made containing the pictures. I am proud to have been a part of this and I hope to be able to more next year.

Tuesday, November 22, 2011

Special Guest Helping

I had a special guest in the shop on Sunday while I was working out there. My 4 year old daughter came out to "Help" with the rocking horses. She had to test out the prototype rocking horse.
Then we took it apart for more sanding, and to use some parts of it as patterns. 
 Safety is very important.
 She saw my safety goggles hanging on the wall and wanted me to wear them to match her instead of my safety glasses.
Hopefully over the long Thanksgiving Weekend I can get all the rocking horses ready to finish.

Friday, November 18, 2011

More work on the Rocking Horse

There hasn't been an official post about it, but Marc aka The Wood Whisper mentioned on social media sites that 118 rocking horses were submitted for the Charity build.

Last night I got all the parts for the second horse sanded to the right shape, and got all the surfaces sanded to 80 grit. In the picture below I have drawn pencil lines across a side, when all the lines are gone I know I have sanded the whole side sufficiently. 

It was a cool 34 outside while I was working last night so I let Ellie Mae come in the shop and hang out while I worked.  The noise from power tools doesn't bother her at all, she laid next to my feet most the evening, even while running the sander and the jig saw. She had to be watched though because she likes to chew on wood, and some times will steal pieces to chew on.


Saturday, November 12, 2011

Proto type horse

The rocking horse charity build was part of the reason I was building rocking horses. There was deadline to submit a picture by the 14th of November and I was getting short on time so I put together 1 of the rocking horses  with out finishing it first so that I could get a picture submitted. When I was drilling out the counter bore holes that will be plugged to hide the screws there was some major tear out in the soft pine board. This means this horse will be painted and a 3 rocking horse will probably be made.


Thursday, November 10, 2011

The Tale of the Second Horse

I started on the second rocking horse last night. I used the parts from the first as patterns and drew the parts out on the board.
 After cutting out the parts with the jig saw, leaving the line, I used the original side from the first horse with the router to make the sides for the second horse match the first. Then I clamped all the sides together to sand the edges.  Sanding more than one board at a time helped keep the edges flat.

After more sanding it will be time for assembly.

Tuesday, November 8, 2011

Rocking around the clock

Okay so I am not working around the clock on these rocking horses but most the work is being done after the kids go to bed. So after working all day and being dad, then going out to the shop for a few hours it feels like I'm working around the clock. Now onto the project.

I am building a pair of rocking horses as part of The Wood Whisper Fall Charity Build.
There were patterns for most parts and the few parts that didn't have patterns the layout was simple.
I cut one side of the horse out and all the other pieces leaving the line and then sanded them to the line.
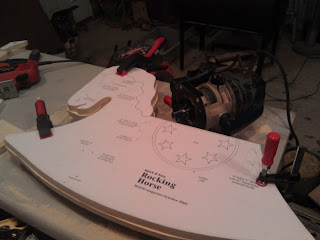
The second side was then cut out a little over sized and then I clamped the 2 sides together and used a flush cutting bit in the router to make the send side match the first side. The picture below was taken right before I trimmed the second side.
 Here are all the parts for one rocking horse. Before I do anymore work with this horse I want to get the parts for the next one cut out and use these parts as patterns with the router.
please check back for more, I am trying to get these completed this week.

Thursday, November 3, 2011

More than just wood working

Some how it got in my head that since I named this Wood Chuck's workshop that I should just post about wood working projects. While wood working is something I would like to focus a little more on there is a lot more than just wood working taking place around my shop. With it being fall there are is maintenance to do on outdoor power equipment along with getting snow removal equipment ready.

One of my most recent projects was to install a wood stove in my workshop. That will make it much more comfortable to work out there this winter.

Before I can do much more on any projects the shop is in need of a good cleaning and rearranging. I still plan to build a Rocking Horse for the Wood Whisper Charity Build, Dead line for that entry is Nov 14th so I have to get that done soon.

Tuesday, September 20, 2011

Charity Rocking Horse Build

I've mentioned The Wood Whisper website before, but now they are doing a charity build. For everyone who builds one of these rocking horse Marc aka The Wood Whisper is going to donate $1 to Livestrong. There are some corporate sponsors that are going to match Marc donations dollar for dollar. Wood Magazine is providing the plans for free. Marc is going to post some videos along the build for anyone who would like to build along.

The entire project is made from a pine shelf board that is supposedly around $23. I plan to build at least one of these. It looks like a nice weekend project.

Wednesday, September 14, 2011

Some assembly required


My most recent project wasn't as much wood working, but was more assembly even though the materials were wood and fasteners. Lots of fasteners.

I built a play set for the kids from a kit from the big orange store. Any one who has ever put on of those together knows they have about 2000 pieces of wood and roughly 8000 screws, or at least that how it felt as I put it together during the hottest weather we had this summer. So far the play set has been a hit so that makes it all worth it.

After assembly I spread mulch around the entire play set, 7 cu yds=2 trailers full. We like the way our back yard is like a small park. This is after the first 3 yards of mulch.

Thursday, July 28, 2011

Hand Cut Dove tails, take 1

Dovetails are a classic joint and are incredibly strong. A lot of times they can be found on drawers but are also used in some boxes. A dovetail joint can also be used as a design element. There are two major types of dovetails: through and half blind. Since dovetails are such a historic type of joint I felt like I need to learn to hand cut dovetails. Dovetails can be cut with a router and there are a lot of dovetail gig and bits available to make them. But for me learning to cut them by hand is where I want to start. I have watched a few videos on how to cut dovetails and read some article also, so I thought it was time to give it a try.

I bought a 1/2" thick poplar board that was 5.5" wide and 4' long. I thought this would be good stock to practice on and if there is any left it can be used to make the treasure chest I mentioned in my last post. I also bought a back saw and a coping saw. Both saws were Kobalt brand from Lowes. I know these may not be the best but just starting out I thought they would work, plus there isn't a woodworking store anywhere within a hour of driving.

First I lay out the tails (which are where the name dovetail comes from since the tails look like a birds tail). I made the layout lines with a knife and then went of the lines with a pencil thinking it would make the knife line easier to see. I think that by making the pencil makes I may have lead myself astray because it was hard to see the knife line and was easier to follow my messy pencil line when sawing.

I don't have a real wood working workbench with a vices so here is how I work on the piece. The work piece is clamped to a crude fence that I made in a attempt to re-saw with my band saw and then the fence is clamped to my work surface. The work surface is a piece of particle board sitting on 2 saw horses.
After I cut the tails I traced the tail locations onto the other piece to make the pins. I didn't have a good way to hold the pieces together while doing this which i think was a major source of error, not to mention my inability to saw where I needed to. The joint did go together with a little persuasion, but doesn't fit together nicely. But I did succeed in making a set of hand cut dovetails.

Overall it was a fun experience and I think I learned a lot doing it. I learned I need to practice sawing straight and along a line. I also learned my chisels need more sharpening and I need a real solid workbench.

Tuesday, July 26, 2011

Summer Time Ramblings

Coming up with idea of something to build is the easy part, finding the time and the financing is the hard part. Therefore a lot of my ideas don't get much further than an idea in my head or a 3D model in sketch up.

Right now it's the middle of summer so that means there is grass to cut, weeds to hoe, and vegetables to pick. My shop doesn't have air conditioning so it's not idea for wood working, both for my comfort and the stability of the wood. One evening recently I went to work in the shop after the kids went to bed (shop therapy) and at 9:20 pm the temperature in the shop was still 86*.

My 3, almost 4, year old daughter has been asking for a treasure chest to put the items she finds outside in (rocks and things like that). She watches a lot of Jake and the Neverland Pirates on the Disney Channel and I think that is where the treasure chest idea came from. So that will likely be something to build soon and I will probably build a pair of them so little brother will have one when he starts finding things he wants to rat hole. The treasure chest will probably be designed in a way that in the future it can be used as a jewelry box.

Thursday, June 16, 2011

Shop built tools, part 2

There will probably be many parts to this series. I actually had a chance to work in the shop 2 days in a row. I cleaned up the hickory blank that will become mallet head some more on the band saw and have the 4 sides mostly smoothed with a hand plane. In the process of cleaning up the hickory blank I noticed that the hickory blank isn't think enough by itself. I am going to sandwich the hickory between some walnut.

The hickory blank is on the left and the walnut on the right is being planed flat.

Wednesday, June 15, 2011

Shop Built tools

Last night I started making a wooden mallet. I cut a blank from a piece of hickory to shape the head out of, and milled a plank of cherry from a piece of fire wood. I am going to make the handle from the cherry. I can't say these are hand made tools since I used the band saw, but I did get one side of the cherry board smoothed using my hand planes.

Tuesday, June 7, 2011

Small Project


With limited shop time and limited supplies on hand I am trying to come up with some ideas of things to make. One item I am going to try to make soon is a wooden mallet. I think I should be able to make one from the smaller pieces of wood that I have been able to harvest from the fire wood pile. After I make it then I could use it with my chisels instead of the rubber mallet I have used while playing with the chisels. Also it would be project where I could practice making mortises. I was thinking about using walnut for the head, cherry for the handle, and some maple to pin the head on the handle.
I would also like to make a marking gauge that could be used for layout.

Thursday, June 2, 2011

Garden Fencing

I know this supposed to be a wood working blog, and this does kind of belong here. Gardening with a 3.5 year old can be difficult. They don't remember to watch where they are stepping, and have a tendency to step on plants. Last year we put down straw to make paths showing where it was safe to walk which helped some. Also I dug a hole in one corner and our daughter would play in it while we worked in the garden.

This year we decided when laying out the garden to give our daughter an area of her own. To start with this was marked out by some stakes and a purple rope. I mentioned to my wife that I should build a fence to define the child safe area and she liked that idea.

Saturday morning I built the 3 sections of fencing that can be seen above. I think it looks nicer than the rope and everyone seems happy, except I was told by my daughter it needs more sides and a gate. That will probably be next weekends project.

Tuesday, May 17, 2011

Shop Therapy

For me there is something therapeutic about spending time in the shop, even when I am not working on anything in particular I enjoy just being out there. It helps to melt away stress and calm me.

I mentioned in my last post that I had gotten some new tools. My new chisels needed sharpened and the new block plane needed tuned up and sharpened. This was a good chance to relax in the shop.

I used some 80 grit sand paper on a piece of flat steel to flatten the sole of the plane. Once all the milling marks from the factory were gone I worked my way up in grits. I used 80, 150, 220, and 400 to bring the sole of the plane to a almost mirror like shine. I would have went finner yet still, but 400 grit was the highest grit sandpaper I had on hand.
After I flattening the sole of the plane I cleaned up a few other milling marks on the plane body, then sharpened the blade. I need to get a new sharpening stone and a angle guide, but I did a decent job sharpening the plane iron free hand.

To sharpen chisels you first polish the back of the chisel, then polish the bevel. The chisels like the plane iron would benefit from a angle guide and a new stone, but they still cut nicely in some walnut scraps I had on hand.

This all took place in a couple of therapy sessions. I think I am due for another round of therapy.

Tuesday, May 10, 2011

New tools!

My birthday was last week, I am lucky enough to have family that cares and supports my hobbies so that means I got some new tools to play with. My wife and I keep a list going of things we would like to have so that when Christmas and birthdays come around and people ask for gift ideas we can share some things we would like. For years now my list has had different tools on it. Some I will get for gifts, others I will eventually buy. Since I am trying to advance my wood working beyond screwing together 2x4's I needed some different tools.


I ended up getting a block plane, chisels, pipe clamps, and a pack Bench cookies.

Tuesday, May 3, 2011

Rainy Day

Managed to get some shop time after work yesterday since it was raining I couldn't do yard work. One day last week I cut some blanks/boards from some more fire wood pieces. Yesterday I started working to flattening the surfaces. Right now I don't have a jointer or a planer so that means I have to use a bench plane to true up surfaces. The bench plane I have my wife got me a few years ago from an antique store. I have done a little work on it , but it needs tuned up.


Even in it's current condition it works for smoothing and flattening boards. Here is a piece of apple I was working on yesterday.


The side I am working on flattening here was concave, so most the work was one the ends.

Friday, April 29, 2011

Project Wish List

I have a long list of things I want to build. Some I don't have enough experience to build, others I don't have the tools to build. I know that sounds like excuses but for now I have to work with the skills I am comfortable with and the tools I have.

There are a few projects that I am wanting/going to build that will be gifts, so those can't be discussed. But here are some things I would like to eventually make.


  • pie safe

  • Morris chair

  • a large book case/display cabinet

  • a dinning table and chairs

  • a large outside dinning table and chairs

Thursday, April 28, 2011

Wood Working on TV

I believe the gold standard for woodworking TV shows is "The New Yankee Workshop." I watched that show from childhood until a few years ago when the shop stopped. Norm made it all look so easy and the show has always inspired me to do woodworking. Some PBS channels may still show reruns, but our local one does not.

There are few shows that are trying to fill the gap such as "The Wood Smith Shop" and "Rough Cut." "The Wood Smith Shop" is pretty good but is more like a cooking show where they show you a few steps on one piece then pull out a piece that is more complete, just like how they can put something in the oven on a cooking show and then pull one out and try it all in the same take. "Rough Cut" to me seems to be more about showing the final project and less on how to get there.

You Tube has some very good wood workers on it. Charles Neil builds beautiful furniture and has very good free instructional videos on you tube. He also has a site that you can pay for other videos and offers classes. Marc aka The Wood Whisperer has a good You Tube channel and a very informative site. Another good one is Wood Working For Mere Mortals. Which can also be found on you tube.

Wood Working For Mere Mortals is where I learned how to make a bandsaw box. Charles Neil has a series going on right now on building pie safes which is very informative and is teaching a lot more wood working technique than just showing how to build the pie safe but how to build anything. These are just a few of the things that inspire me and make me want to become a better wood worker.

Thursday, April 21, 2011

Spring

Spring was a bad time to start this blog. I will do my best to do some wood working and write about it, but spring time is very busy for me.

The grass is growing like crazy, it is about time to start working in the garden, and like most home owners I have a to-do list of things on the house that seems to grow daily.

We had a severe storm come through on Tuesday so that meant I got to do some gas powered wood working. Over the winter our large sycamore tree lost a large limb, while cutting up other storm debris I cut some rough boards from sycamore. I am not sure how the boards will turn out, I cut them with the chainsaw and placed them in the wood shed to dry. It will probably be next year before they are usable.

Tuesday, April 12, 2011

Bandsaw Box

I was inspired by a few videos on you tube to try and do a few things with the bandsaw. One of them is to do some small scale saw milling from firewood pieces and trees from our property. The other was making a bandsaw box.

One problem, I don't have a bandsaw. However my dad got some of my grandfather's tool when grandpa passed away. So I have brought grandpa's bandsaw to my shop and have been putting it back to use.

I have some walnut that the power company cleared at our old house that I had been saving because I wanted to mill some boards from it. And I saw some nice looking pieces of apple wood while I was splitting fire wood (apple is a very good wood to smoke with.)

So after I did some cleaning and tuning on the bandsaw it was time to try and cut some planks. I cut one of the smaller piece of walnut at around 1" (4/4 for the wood workers reading this) and then just made a squared up blank of the apple wood. I set the walnut aside and then used a hand plane to smooth up the apple blank. Now I had a apple blank that was roughly 2" thick and 8" long and 3" wide. I knew I wanted to make a bandsaw box but had to stew about what shape to make it and where to go from there. I ended up making a oval shaped box. I will do a how to write up next time I make a bandsaw box. I applied several coats of boiled linseed oil to the box before putting 4 coats of spray on poly on it. For my first attempt at a box I am happy with how it turned out.