Tuesday, May 17, 2016

Old Tool, New Life

I have posted several times about tools that were my grandpa's or great grandpa's, but here is another. My favorite hatchet to carve with belonged to my grandpa. It had a handle on it that he had made himself.
Here is Grandpa's hatchet with the handle grandpa had made

I wasn't knowledgeable enough about axes/hatchets to know how to correctly fix the fact that the head was loose on the hatchet. I would typical bang the bottom of the handle on a stump to try and tighten it up while working, One day mid winter while splitting some kindling to get the stove going the head broke off the handle. I was sad that I had broken something my grandpa had made. I then did some research on the correct way to fasten (hang) a head on an ax or hatchet.

Hickory is the wood of choice for ax and hatchet handles. After digging in the wood rack I found some Hickory. I rough cut the overall shape on the bandsaw and then did all the shaping with rasp and files.

While making the handle and studying the hatchet head I realized that one side of the head was flat and the other side was beveled. After looking online and talking to some friends I decided that originally the hatchet head had a single bevel and would have been for hewing timbers, and that some point someone sharpened it putting a bevel on both side. I decided to reshape the head and sharpen it back having a single bevel. I didn't want to remove all the pitting and patina on the blade so I didn't grind the sides, and focused my work near the cutting edge. I did the majority of the reshaping using the old stationary belt sander that I had gotten from grandma. With a 60 grit belt I established the single bevel cutting edge and with a little filing it was sharp enough to shave. I plan to polish the cutting edge more soon.
The flat side of the hatchet 
The curved/beveled side
I hung the head on my hickory handle and then finished it with boiled linseed oil. The hickory really came alive when I applied the oil. I shaped the handle where it had a nice place to grip right under the head for detailed work and made a nice palm swell on the bottom of the handle to give a good grip when taking a full swing. What I have learned while doing this has made me want to restore some other axes and make some more tools.  I am very  glad to have grandpa's hatchet back to usable condition. I really enjoy using these old tools, thinking about what was built using them. I hope that someday someone in my family will be using these tools and some of mine also and thinking back about me.


Saturday, December 12, 2015

Circuit Board Yo-Yo

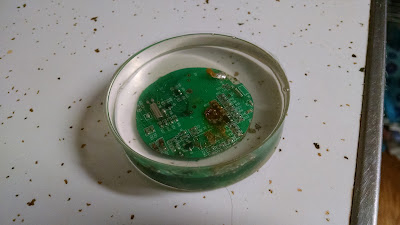
I've been a fan of the circuit board pen blanks since I first started making pens. I've made a few and have always been happy with how they have turned out. Now that I've been making pens for a few years it has become hard to come up with gifts to make for family members. One day while making another circuit board pen the idea of making a circuit board yo-yo came to me. I wasn't sure if I would be able to cut the circuit board with out them shattering. I started by removing most the components from the circuit board, and then I cut two circles on the bandsaw trying to keep the details of the board and some of the components that were flat to the board.


Next it was time to cast the boards into clear acrylic. I went with Amazing Clear Cast by Alumilite because it has a long open time which I hoped would allow for a blank with fewer air bubbles.

I used the reverse side of some bracelet molds I bought when I purchased the acrylic
The acrylic material machined well and was easier to work with than most the other acrylics I've turned before.

I did all the shaping with a scraper, and then sanded from 320 all the way up to 12,000 and finished with some plastic polish.
I am extremely happy with how this turned out and look forward to giving it to my dad for Christmas


I made a video explaning how I made the yo-yo.
Thanks for stopping by.

Tuesday, November 17, 2015

Mail Center

My wife wanted a mail center/message board to help contain some of the clutter on the island. We looked at a few ideas on Pinterest and then drew a design we like. She found a old drawer from a sewing machine that she wanted to use as one of the containers on the board. She found a metal box she liked for the other box on the board but it wasn't the size she wanted. I had some scrap galvanized steel and some pallet wood so I made a simple box.
 For this project I chose to use a pine project board from the big box store.
 After we had our two boxes we decided that wasn't room to put a chalk board on and it would be used to hold mail. library books, and the kids back packs.

 I tried a chalk paint finish on this project. I wasn't a fan of the finishing wax, but I like how the paint went on. My wife is on the look out for an "M" to put in the top area.

Thursday, September 24, 2015

Rough turning bowls

Last year I had a co-worker tell me about a weird piece of wood that his dad had cut, he explained it me and I told him I would like to have it.
The wood in question turned out to be flame box elder.

I split the pieces in half length wise and sealed the ends with paint to slow down how fast they dry out and to minimize cracking.

Fast forward 11 months, I've gotten a chuck for the lathe and I'm planning to make more bowls. I used the bandsaw and made crudely round blanks from one of the halves shown above. This wood isn't completely "dry" yet but also wasn't as green as a fresh cute tree. So I decided to rough turn these and allow them to finish drying before I turn them to their final shape.

I turned two bowls from the half a log piece. The larger is just under 8" in diameter, and the smaller is around 6".  I left the wall thickness roughly 10% of the bowl diameter as is standard practice for rough turning bowls.  I weighed each bowl and then packed them in a paper bag with the shavings/chips turning them. I will weigh them regularly and once they stop losing weight (moisture) I will finish turning them. I have several more pieces of the flame box elder waiting for me to get to using it.

Wednesday, September 16, 2015

September 2015 Shop Tour

I know I appeared to fall off the face of the earth after my April shop tour but I'm still around and my shop didn't get blown away. Here is the September edition of the tour.

Monday, September 14, 2015

Making Memories While Making Pens

Since I started making pens and pencils I've given a lot of them as gifts. Recently I gave my nephew a pen for his birthday.
Zane's Pen
He loved it but asked if I could make him pencil, I suggested that next time he was up that we could make it together.  His older sister liked that idea also, she even picked out the blank she wanted to use.

I got the blanks ready and next time they were up we made the pen and pencil. I had each of them start out by practice turning a piece of scrap before turning the actual project.
Trinity ready to turn


Zane concentrating on the work at hand


Zane's Cherry mechanical pencil

Trinity's confetti pen
It was a lot of fun to work in the shop with the kids. They both seemed very proud of what we made together.

Thursday, April 2, 2015

Wedding Arbor

My cousin asked me to make an arbor for her wedding. It was going to be painted so that meant I could build the arbor from standard construction lumber.  I ripped the pieces down on the table saw to remove the rounded edged on the 2x4's.

I designed the arbor with "4x4" legs so after I had the 2x4 cleaned up it was time to glue the legs.
I cut the arched top rails from a 2x8. I used a piece of PVC pipe and some sting to make a bow template for the arch.
The legs were notched out for the cross bars to create the end assemblies.
The arched rails were joined together with 3 cross rails

For the top the cross rails the endges need something more than a square end. I used the table saw to create the arc. After cutting several saw kerfs I used a chisel to remove the remaining wood and refine the shape.


The arbor was 3 sections that could easily be carried into the church.
Painted

They did a great job of decorating the arbor.
I was very proud of how the arbor turned out and it looked great up on the stage.