Tuesday, December 11, 2012

Cutting Board Crazy

I've been making several cutting boards lately. I finished four over the weekend and have a fifth ready for final sanding and oiling. Mostly I have just been doing a standard checker board pattern, but I did experiment a little on a maple and cherry board.
I finish the cutting boards with mineral oil.
Experimental cherry and maple cutting board before applying oil finish.
The one I still have to finish is made from maple and walnut. It maybe my new favorite.
I am running out of scraps so this maybe the last batch of cutting boards until I do some bigger projects and build the scrap pile back up. I've also been working on some Christmas gifts and will have to wait to post anything about those.

Thursday, September 27, 2012

Finished gifts

The walnut box I was building for my grandma and the cherry and maple cutting board both turned out great.

The cutting board was a gift for my sister and she was very excited to get it. 
 I was really proud of of how the box I made for grandma turned out.


I have a feeling I am going to be making a lot of cutting boards as Christmas gets closer.

This is only about 3 weeks over due. I am going to try and get into a schedule of posting more often.  

Tuesday, September 4, 2012

Gift making

Saturday morning I managed to got a little shop time in and work on a few projects that are need to be finished up rather quickly.

The maple and cherry cutting board was ready to run the glue up through the planner, next I cut it into strips and reglued it in a end grain checker board pattern. Here is a picture of it out of the clamps and ready to sand and finish.
 I also worked on the box I am building for my grandma. I routed a grove in the sides to hold the bottom, and then after some trial and error I managed to make some acceptable miter joints on the corners. This is mainly a display piece, if it was something that would see extensive use I would add some splines to the miters to strengthen them.

 The piece I used for the bottom is a lot of sap wood but I wanted the to be made completely from wood that was grandpa's. If I add any ascent wood it will be from the few piece of wood I have harvested myself.
 I still have to cut the lid to size and add hinges. I will be working hard this week to have the box ready to give to Grandma this weekend at her birthday party.

Thursday, August 30, 2012

Where did it go?

Where did it go?  What is "it"? It might be summer, time in general, or the tool you just had, but I end up asking myself "where did it go?" a lot.

I can't believe it's been about 2 weeks since my last post and the last time that I spent much time in the shop. I made an effort last night to get some shop time in. I have some time sensitive projects (gifts) that I need to get done before next weekend.

One of those projects is a box I am building for my Grandma's birthday. It will built from the walnut that she gave me and is being built to hold one of my Grandpa's Bibles. I had previously milled the boards two a thickness of 1/2". Last night I cut the pieces to the rough dimensions.
 The first cutting board I built ended up being a failure, it looked nice but I used the wrong type of glue and when it got wet on the counter some glue seeped out. I found I used the wrong glue part way through construction, but I went a head and finished it. It has now came back to the shop. I sanded all the areas that felt rough, then gave it a coat of boiled linseed oil, and have started to apply shellac. I think it will be come my cherry and walnut paper weight.
I have already started a new cutting board to replace the failed one. It just needs sanded and finished applied. This one is 9"x9" and is 1.25" thick.
Last night I started another cutting board this time made from Hard Maple and Cherry,
I finally got the cypress that I bought for my brother planned and delivered last weekend. I really liked the looks of it and want to build with some cypress in the future.


Thursday, August 16, 2012

Walnut lap desk: milling parts-part 2

I have all the wood for the lap desk planed to the correct thickness now, and will be starting to cut pieces to size soon. 
This week I made another trip to the hardwood dealer and picked up 40 board feet of Maple for a Butcher's Block style island I am making. I am lookingforward to this project, there will be a lot of glue ups that will have to be done, so it should be interesting.
Buying glue by the gallon means things are getting serious.

here is the Maple.

Over the weekend my shop helper was wanting to make something so we dug through the box of small piece of hardwood (it's not scrap if it can still be used) and we found some pieces that would make a nice wooden mallet for her. It is made from oak and cherry and should hold up to what she can throw at it for now. Its not perfect, but she is happy with it. 


Thursday, August 9, 2012

Walnut lap desk: milling parts

I've made mention in some recent blogs about a walnut lap desk I am building for my wife. The plans for it came from issue 202 of Woodsmith magazine. In the magazine they build it out of mahogany, I am going to build Jenny's from walnut so it will match the entertainment center I am planning to build. That is so the lap desk will look nice while sitting on a shelf in the entertainment center. Here are a few pictures from the magazine of what the desk will look like.

Last night I got the pieces that I re-sawed to 1/4" thick glued back up. I still have a to resaw a few more piece of 4/4 into two 3/8" pieces. I am hoping to start cutting parts to size this weekend.  I plan using a box joint instead of dove tails on the case construction.

Wednesday, August 8, 2012

Finished the Re-finish

Back in April I posted Quilt rack: clean up to finish I've been working on it between other things but I finally finished it. I found a stain that on pine matched the oak cabinets in my mom's kitchen according to sample display at lowes.  I did a few test on the back side and found that using a prestain conditioner match the oak cabinets.

Here is the before and after pictures. I will get a picture of it in use once my parents get the quilt rack hung up.


Overall the color looks alright but I am still not a fan of staining pine. There were areas where the stain hardly took at all. I gave it a coat of the garnet shellac I used on the knife block with hopes of darkening it up some. Then I gave it 3 more coats of clear shellac.  Mom was pleased with how it looks so that is what important.

I have also been working on the walnut lap desk.  So far I have the panel glued up for the top and bottom. I resawed the 4/4 board into 3/8" thick boards and have book matched the center section. I used a 1/8" spline along the edge glued boards. Here is the glue up, this is the top and bottom.

Thursday, August 2, 2012

Cutting board is done

Here is the finished cherry and walnut cutting board.

The cutting board was a fun project, I will probably be making a lot more of them. 

Last night I started to mill the boards for my next project, a lap desk for my wife, built out of walnut. I bought a 4/4 (1") thick board and am trying to resaw it into two 3/8" thick boards.  My bandsaw doesn't have the clearance to cut a 7.5" wide board, and it is not up the job of resawing anyway. I made and attempt to resaw on the table saw by making a pass through each side, but that left a approximately 2" wide piece in the middle uncut. I am not Roy Underhill so my hand tool skills and collection left me looking for a better option to resaw these boards. My plan for now is to rip the boards in half then resaw them and then glue them back together. I have successfully resawn a board on the table saw by leaving a 1/4" strip between the two side and then hand sawing them apart. 

Dust collector update:
I am very happy with how well the dust collector works with the planer, before using the shop vac sometimes chips would come flying out the front because there were more chips than it could handle. With the dust collector this is now longer a problem. I am less than happy right now with hos it works with the table saw, but that is not the collectors fault. The table saw has large gaps between the table top and the saw body, by filling those gaps I should see an improvement in dust collection.

Tuesday, July 31, 2012

This thing sucks....

As I have been busier in the shop I have been creating a lot more saw dust and wood chips. My old shop vac is no match for the amount of chips and dust the planer makes, and the 1" dust port on the back of the table saw is joke. It was time for a real solution. Over the weekend I bought a 2hp dust collector. 
 Wow is this an improvement over the shop vac.  I also bought the required adapters and fittings to be able to hook the collector to the table saw and will be enclosing the open stand on the jointer to add dust collection to it. I plan to build a chip separator soon so I don't have to empty the plastic bag on the collector.

The first cutting board project is about done. I have put 2 coats of mineral oil on it and will give it 2 more coats for now. Wood cutting boards need new coats of oil applied with use as they start to dry out. Before I applied the oil and after sanding I used the new router table to round the edges of the cutting board.  I am very happy with how the router table worked.

BBQ from the wood shop

What does BBQ have to to with a wood shop? Well when Cherry wood makes for a very pleasing smoke. My wife had been wanting ribs for a few months, and she saw some on sale last week. That gave me a reason to fire up a smoker and make some BBQ. I even had some cherry scraps after my latest cutting board project. I cooked some spare ribs and a pork loin for about 5.5 to 6 hours and here are some of the results. The ribs were not as dark as they look here. 


Wednesday, July 25, 2012

First Cutting Board Glued Up

Last night we got the kids to bed on the earlier side of the average bed time. So that meant there was a chance for a little more than normal shop time.  It was hot in the shop, but I didn't open the doors and invite a bunch of bugs in to feast on me. Even though it was hot it was an enjoyable time in the shop.  I took time to practice some techniques I will be using on an up coming project and I worked on a cutting board.

The cutting board is made from cherry and walnut. Some of the walnut in this project came from a tree the power company cut down at our previous house.
Here are the pieces ready to glue up.
 Here they are glued up and in the clamps.
Tonight I will be trimming the ends up, running the whole panel through the surface planer and then I will cut across the width and turn the pieces up exposing the end grain. I will glue the pieces back together again but I will flip every other piece creating a checker board pattern.

Tuesday, July 24, 2012

Router Table Top and Fence are finished

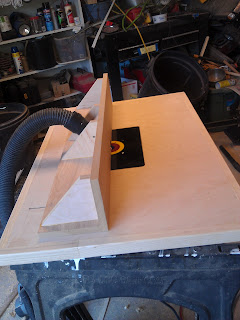
I finished building the router table top by wrapping the edges of the ply wood with ash.  This will protect the edge of the plywood.  I also built a fence for the router table using some veneered MDF I had given to me. The fence is adjustable due to slots cut through the table top. It also has dust collection right at the router bit which appears to collect a majority of the dust and chips created by the router. Eventually I want to build a cabinet to go with the top with storage for router bits and other accessories, but for now saw horses will have to do.

 Here you can see the slots in the top that the fence moves along. I will be adding knobs to replace the acorn nuts that are currently holding the fence on.
 I also started going through my scraps and have selected a few pieces I am going to use to make a small end grain cutting board.

Tom's Workbench Give Away!

Back on July 9th Tom over at Tom's Workbench post that he had recently cross the 950 post count and that he was arranging a give away for his 1000th post. He has a lot of great prizes lined up, for info on the give away check out this post. Tom has been posting like a mad man since the announcement and he told me today he has hit 965.  Tom was the creator of "Get Wood Working" week.

Monday, July 16, 2012

Completed Knife block

Over the weekend I applied 3 coats of garnet shellac to the knife block and then a coat of wax. Once the shellac and wax were dry I began cutting the skewers, I bundled 100 skewers together at a time and cut them with a hand saw. I am very happy with the way the knife block turned out. Here are a few more pictures.


Thursday, July 12, 2012

Mid Week Update: July 12th

Last night I got in about an hour of shop time after the kids went to bed. I applied a coat of boiled linseed oil to the knife block. The oil really brings the wood to life.
I am going to let the oil dry for a few days and then I will start applying shellac. After the shellac all that is left to do is cut the bamboo skewers to length and start using it.

I also had time to mount the router to the router table insert. Next I need to make the fence for the router table.


Monday, July 9, 2012

Cross Cut Sled and knife block update

Over the weekend I had a chance to finish building a cross cut sled to use with my table saw. I My last post I mentioned that I had the base cut and had laminated the fences. The first thing I did was true up the edges of the fences, and cut them to length.  I cut them 2" narrower than the base.  I used some oak strips as runners for the sled.  The runners slide in the miter slots on the saw top. After attaching the front fence and the runners to the base I cut through the base most the way to the back fence.  I then used a large square to square the fence to the saw kerf. After the initial squaring I used a 5 cut method to test the accuracy of the sled. I had to do the test twice, but I was able to get the fence dialed in. I also built a blade guard to keep the blade covered as it comes out the back fence.

I wanted to build the cross cut sled before I tried to cut the finger joints on the knife block, in the pictures above I had already used the sled to work on the knife block. I got the joints cut with the table saw and then cleaned them up by hand with chisels. Every wood worker knows you can't have to many clamps, and I need more.


I have already glued a bottom in place and sanded all the surfaces. Next it will get a coat or two of boiled linseed oil and then 3 coats of shellac.